# About Variables
In this section we will explain CpExtra's Command Variables, Preference Variables and Info Variables.
About variable prefixes
Some CpExtra features allow you to create variables with special abilities by giving them a special prefex. For example, variables with the prefix ls_ save their values to local storage in the user's browser. We discuss those features under the Features page.
# Variable types
All CpExtra variables belong to one of the following three types:
- Command Variables
- Preference Variables
- Info Variables
# Command Variables
These are the most frequently used variable type. Each variable represents an 'action' or 'command'. When you assign a value to these variables, CpExtra reads that value and acts upon it.
For example, if you assign xcmndHide with SmartShape_1 CpExtra will search the project for an object name SmartShape_1 and hide that object.
Examples of commonly used command variables include:
- xcmndHide
- xcmndShow
- xcmndAddEventListener
- xcmndScore
# Preference Variables
Preferences are behaviors you want to persist for the whole project. Usually, you'll set them once and forget about them. That said, you can change them again once they are set.
Usually you'll give a preference variable its initial value in the Project > Variables... dialog.
Examples of commonly used command variables include:
- xprefDisablePlaybarScrubbing
- xprefInitAction
# Info Variables
CpExtra exposes information through these variable's values. Much like how Captivate exposes the number of the current slide through the cpInfoCurrentSlide system variable. These variables are READ-ONLY and their values cannot be changed.
Commonly used info variables include:
- xinfoEventTarget
- xinfoProjectElapsedMinutes
- xinfoProjectElapsedSeconds
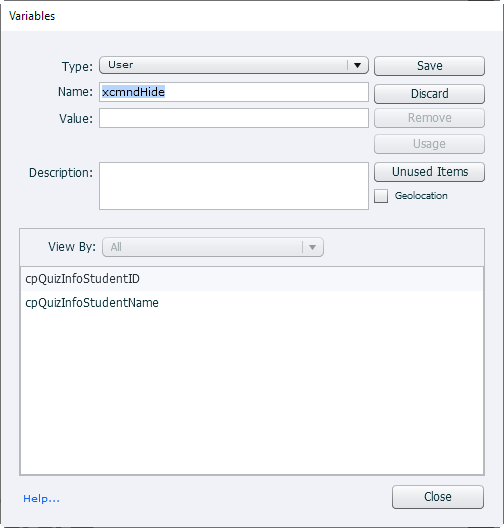
# How do you create variables?
To use a CpExtra command, preference or info variable you must first define it.
For example, xcmndHide is probably CpExtra's most frequently used command variable. To define it in Captivate:
- Go to Project > Variables...
- Click: Add New
- Write the name of the variable (in this example: xcmndHide)
- If you're defining a preference variable, you'll probably want to give it an initial value in the Value: field. For other variable types, giving the variable an initial value will not cause any behaviour.
WARNING
All variables are case sensitive. xcmndhide is not the same variable as xcmndHide. CpExtra ignores variables with incorrect capitalisation.
TIP
All CpExtra variables start with the letter x (for eXtra). Therefore, when picking a variable from a drop down list the CpExtra variables will appear down the bottom.
Let's say however that there is a particular CpExtra variable you use all the time and you'd like the convenience of it appearing at the top of the variable list. In that case, define the CpExtra variable with an underscore character like this '_' in front of its name. For example: _xcmndHide CpExtra will still recognize it, and it will conveniently sort to the top of your list of variables.
# Interacting with variables
By making assignments to variables, you inform CpExtra of what action you desire it to take.
Assignments can be made through actions or advanced actions.
# Actions
When in Captivate you add a button and configure what happens when it is clicked you pick from a list of actions. They include things such as:
- Continue
- Go To The Previous Slide
- Go To The Next Slide
- Jump To Slide
- and so on...
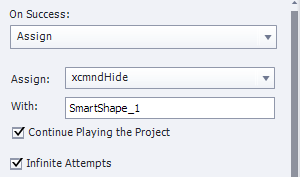
When you to trigger one of CpExtra's commands, you would pick the Assign action.
From the Assign: drop-down select a CpExtra variable (that you would already have defined under Project > Variables). Then in the With: field enter your instruction to CpExtra.
For example, if you wanted to hide all the objects in the project who's name starts with SmartShape_, you'd open the Assign: drop down an pick xcmndHide, then in the With: field enter the text string SmartShape_#.
Note
For the sake of simplicity of writing this document, whenever we refer to an assignment to a variable, we will write it out using the format below:
Assign | <VARIABLE> with <VALUE>
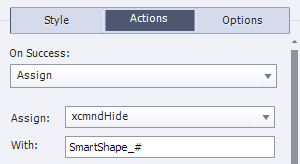
For example, the assignment pictured above would be written out:
Assign | xcmndHide with SmartShape_#
# Advanced Actions
Sometimes to get the behaviour you require, you need more than one action. This is where you define an Advanced Action. These allow you to trigger a series of actions one after the other. The actions you can trigger are the kind you can trigger on a button's Success action.
The Assign action is probably the easiest way to give a variable its value. The Expression action might sometimes also prove to be useful, but it's a little more complicated so in this documentation we will always use Assign.
The Assign action works differently in an Advanced Action than it does in single actions that can be selected from the Properties panel. In the Advanced Actions dialog, after picking the Assign action a drop down will appear allowing you to choose the name of the variable that will receive the assignment. After picking that variable the next drop down will allow you to choose what value to assign. However, you will first be faced with a choice: Assign the value of another variable or a literal value.
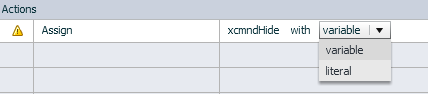
Choosing variable will present you with another list of variables to choose from. When this action is run, Captivate will read the value of this variable, and assign it to the original variable.
Choosing literal will present you with a field where you can enter a string of text.
While you may at some times have reason to use the variable option, we find that 99% of the time we write our instructions in literals. So, in this documentation we will assume you are always making literal assignments.
This being the case, if you were to convert the following into an Advanced Action:
Assign | xcmndHide with SmartShape_#
From this drop down you would choose: literal
Then type SmartShape_# into the field.

Tap ENTER and you're done!
# Data types
Data comes in different types. For example:
- Numbers
- Strings (A fancy way of saying: Letters and words!)
- Boolean (yes or no)
Usually an action only makes sense if applied to a particular data type.
For example: xcmndRound takes a number like 3.456 and rounds it to the nearest number: 3. Would it make sense to try and round a string such as 'french fries' to it's nearest number? No, the data type is wrong (and you can never have too many french fries).
Usually this is not something you need to worry about as CpExtra will imply the data type from what you write. But it is still good to know a little about data types.
# Numbers
This counts as whole numbers (like: 2, 4, 53, 1800) and floating point numbers (1.2, 333.3333, 3.14).
However, if you're writing numbers higher than a thousand do not include commas like: 1,234,567. Remove the commas instead: 1234567
# String
Note that when making an assignment to a command variable, CpExtra will remove all space characters. So something like:
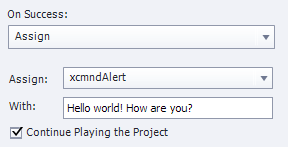
Will effectively become:
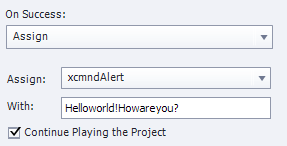
To get around this, use square brackets []. See this page for more information.
# Boolean
A positive boolean value can be written out in several ways:
- true
- yes
- 1
A negative boolean value can be written as follows:
- false
- no
- 0
All are equally valid.
# Get and set mode
Certain command variables have GET and SET modes. These variables include:
- xcmndScore (relating to an object's score in the quiz)
- xcmndPosX (relating to an object's horizontal position on the slide)
- xcmndPosY (relating to an object's vertical position on the slide)
These variables have something in common. Sometimes you want to READ (or get)an object's score/x position/y position to help you make calculations. Other times you want to WRITE (or set) an object's score/x position/y position.
For example, let's say you had two slide objects:
- SmartShape_1
- SmartShape_2
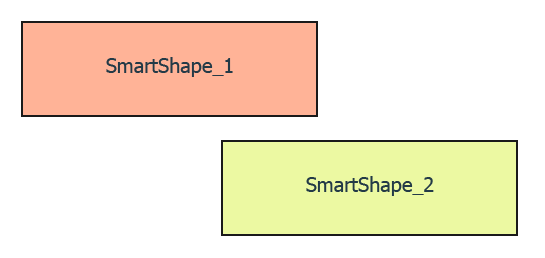
We also have a variable called: MyVar
You want to move SmartShape_1 over to the right so that it has the same x position (horizontal position) as SmartShape_2. You can do all this with the xcmndPosX variable in the following way:
Assign | xcmndPosX with MyVar, SmartShape_2
Assign | xcmndPosX with SmartShape_1, MyVar
Here's what these two lines of code are doing:
- Get SmartShape_2's current x position and save it into the variable MyVar.
- Set SmartShape_1's x position to be equal to MyVar.
The first line shows xcmndPosX in get mode. The second shows xcmndPosX in set mode.
How does xcmndPosX know whether to use get or set mode? By detecting what data types have been assigned to which parameters
Get mode is used if...
- Parameter 1 is a variable
- Parameter 2 is a slide object
Assign | xcmndPosX with MyVar, SmartShape_2
Set mode is used if...
- Parameter 1 is a slide object
- Parameter 2 is a variable
Assign | xcmndPosX with SmartShape_1, MyVar
The modes become easier to understand if we imagine an equals sign between the parameters. If I wrote:
MyVar = SmartShape_2's x position.
We'd expect SmartShape_2's x position to be recorded in our MyVar variable. A get operation.
However, if I wrote:
SmartShape_1's x position = MyVar
We'd expect SmartShape_1's x position to change, becoming equal to MyVar. This is how a set operation works.