# Preference Variables
Below is an alphabetical list of all preference variables offered by CpExtra.
# xprefDebugMode
# Parameters
| (1) Boolean (default: true) |
|---|
| Boolean value (true/false) to turn debug messages on or off. |
# Description
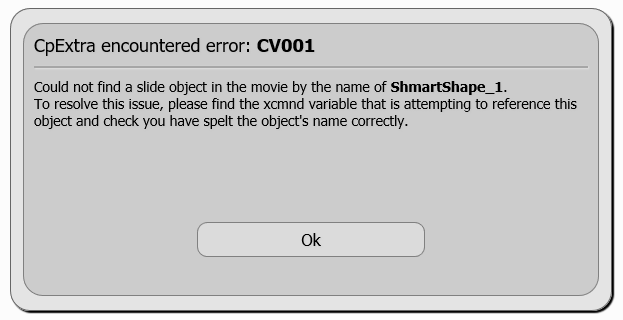
Whenever we use CpExtra there is always the potential for errors. For example, we might mis-spell the name of a slide object to hide, or enter a number where we were supposed to enter the name of a variable. When CpExtra detects one of these mistakes it triggers an alert message to appear.
These messages can be very useful during development of course content and interactions. However, you likely do not want error messages appearing when the learner views the course after it's Go-live date when the published content is being viewed by potentially hundreds or thousands of users.
# Use cases
xprefDebugMode is set to true by default, meaning that debug messages will be shown. Assigning the preference variable to false disables all debugging messages for that module.
Assign | xprefDebugMode with false
# xprefDisableGestures
# Parameters
| (1) Boolean (default: false) |
|---|
| Boolean value (true/false) to turn Captivate gestures off. |
# Description
Captivate includes certain special gestures for navigating the course on mobile devices. Namely, the ability to swipe left and right to move forward or backward one slide. For branching projects this may be undesirable. To disable this behaviour, create the xprefDisableGestures variable and assign it a positive value (like: true or 1)
This will also disable pinch and zoom gestures.
If instead, you wish to to disable gestures on one slide only, go to that slide and add this to the slide enter action:
Assign | xprefDisableGestures with true
Then on the slide exit action add:
Assign | xprefDisableGestures with false
# xprefDisablePlaybarScrubbing
# Parameters
| (1) Boolean (default: false) |
|---|
| Default value of false means playbar scrubbing is enabled. If set to true playbar scrubbing is disabled. |
# Description
By default, clicking different points along Captivate's horizontal progress bar (sometimes referred to as the 'scrubbing bar') allows the user to jump to different sections of the content. However, this presents a problem in courses with branching scenarios as the learner could easily use the playbar to navigate to slides they were not meant to view.
# Use cases
To disable the user's ability to scrub the playbar, assign the value of xprefDisablePlaybarScrubbing to: true.
Note
Playbar scrubbing is disabled by default on mobile devices. This is standard Captivate behaviour and setting xprefDisablePlaybarScrubbing to false will not change this default behaviour to allow the user to scrub the playbar on a mobile device such as a tablet or smart phone.
Feature not available in Internet Explorer
Internet Explorer does not support the mouse-events: none CSS style on which this feature depends. We do not currently have a work-around to resolve this limitation of Internet Explorer.
# xprefDocumentBackgroundColor
# Parameters
| (1) Hexadecimal color |
|---|
| The hexadecimal code (e.g. #00FF00) of the color you wish to appear as the web page background |
# Description
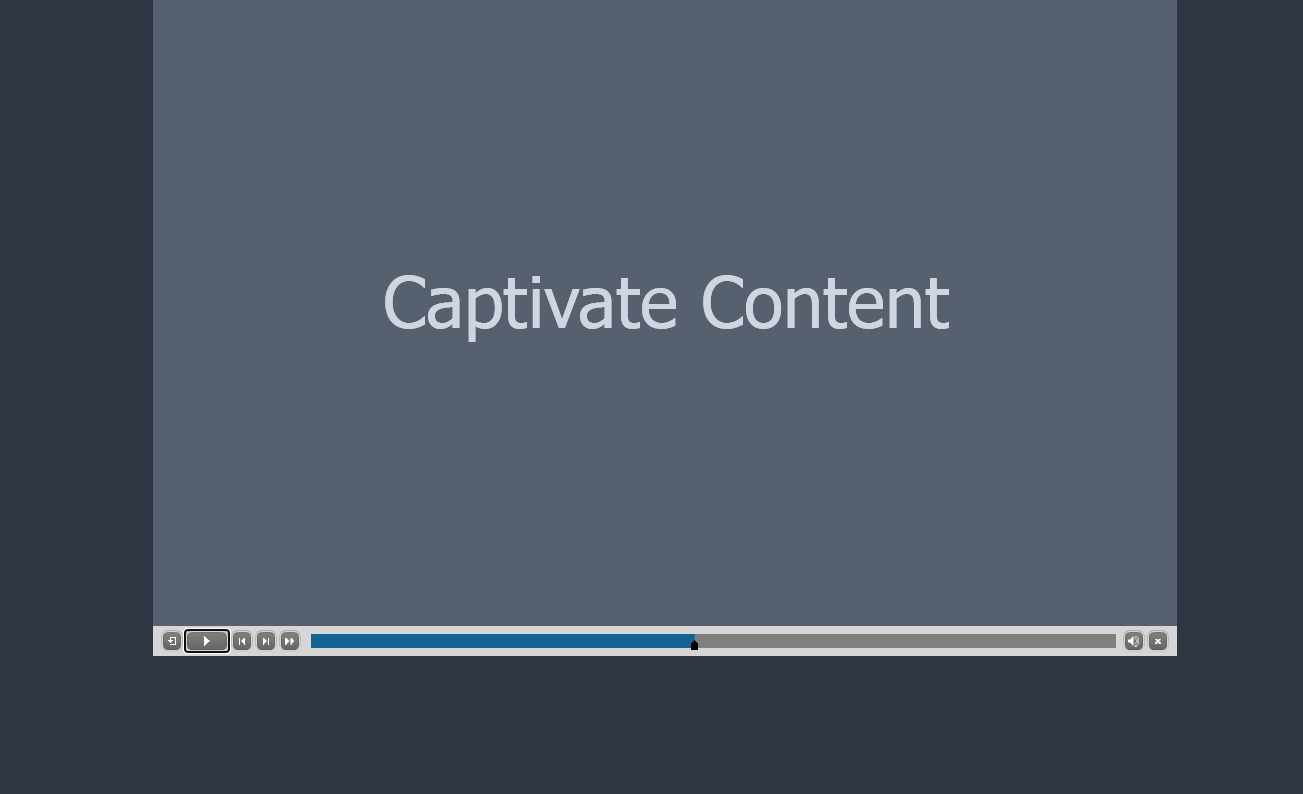
Captivate allows you to specify the background color of slides, but what about the area outside the slide? xprefDocumentBackgroundColor allows you to change the color of what appears outside of the Captivate export.
# Use cases
Suppose you have a Captivate project where the design color palette is primarily dark. In that case, the default white background that surrounds the Captivate player may be distracting.
If we wanted to change it to a dark grey color such as #2f3542, we could do this by assigning xpreDocumentBackgroundColor in the following way:
Assign | xprefDocumentBackgroundColor with #2f3542
The result would look something like this:
# xprefDoubleClickDelay
# Parameters
| (1) Number (default: 0.5) |
|---|
| Number of seconds CpExtra should delay before determining if a click event is actually a double-click event. |
# Description
As explained here, if a click event and a double-click event are added to the same object, CpExtra must wait a few milliseconds to determine whether a click or double-click event occured. By default it will wait half a second. If your target audience is not very 'technology literate', they might not complete a double click in under 0.5 seconds. So, you can increase (or decrease) the time delay allowed for a double-click event by changing CpExtra's xprefDoubleClickDelay preference variable.
# Use cases
To change the delay period to three quarters of a second, assign xprefDoubleClickDelay with 0.75:
Assign | xprefDoubleClickDelay with 0.75
# xprefEnsureCpMateLoad
# Parameters
| (1) @syntax query |
|---|
| An @syntax query that matches the name of all Web Objects that include CpMate |
# Description
This feature is primarily associated with CpMate. Therefore, we include it's documentation in the CpMate help.
Click here to learn how to use xprefEnsureCpMateLoad. (opens new window)
# xprefInitAction
# Parameters
| (1) Interactive Object | (2) Criteria (default: success) |
|---|---|
| Name of a slide object currently configured to execute an advanced action on success or on last attempt. | The name of the action criteria that will be used to execute the action. |
# Description
xprefInitAction automatically triggers an advanced action when timeline play starts. The important difference here is that this action will be triggered regardless of the slide on which playback starts. This is very useful (even essential) for circumstances where users may be reopening and resuming a module after earlier terminating and you need to execute certain actions to ensure the module's navigation system or scoring are properly initiated.
This essentially a 'one shot' xcmndCallActionOn that runs right at the start of the project's timeline. This is better than putting an Advanced Action at the very first slide of the project because LMS Resume Data Bookmarking or Self-paced-learning bookmarking could cause the playback to resume at some highly variable point mid-way through the slide order.
# Use cases
Create a button (or any other interactive object) and configure its success or last attempt action to be the Advanced Action that xprefInitAction should run at timeline start.
Then in the Project > Variables dialog, configure xprefInitAction's first parameter to name the slide object currently set to execute the action, and then in the second parameter specify whether the action's trigger event is success, last attempt, fail etc. For example, if the slide object Button_1 is currently configured to execute the action on success, then you would enter the following text as the default value for xprefInitAction:
Button_1, success
WARNING
If you are finding this variable is not working when using Captivate's preview options for Next 3 Slides or From this Slide, it is probably because the slides you are previewing do not include the Interactive Object that is configured to execute the action. Simply put, if xprefInitAction cannot find the named slide object (e.g. Button_1), it cannot trigger any success action configured for that slide object.
# See Also
# xprefInitLoadJSFromAction
# Parameters
| (1) Interactive Object Name |
|---|
| The name of an interactive object who's success/failure/on focus lost actions load JavaScript files. May also use #syntax query |
# Description
xcmndLoadJSFromAction is a very useful command variable which allows you to load JavaScript from external .js files. However, it comes with the downside where the .js files may not load in time for the On Enter action of the first slide. Therefore, we created xprefInitLoadJSFromAction. Think of this variable as a one time assignment to xcmndLoadJSFromAction which happens as early as possible. By as early as possible, we mean even before the learner clicks the starting play button.
The up side of this is that any .js files should be run before the On Enter action of the first slide.
The down side is that when the .js files run, Captivate is not yet completely set up. Therefore, documented Captivate JavaScript interfaces may not yet be ready to run. However, if all your .js file does is define some functions and objects in the global scope which will be called by Execute JavaScript actions later on in the course, then you'll be fine.
# Use cases
When assigned the name of an interactive object, it will check if that object's success, failure or on focus lost action contains an Open URL or file action. If that action points to a .js file, CpExtra will then load and run that JavaScript file.
We use this method rather than pointing directly to a JavaScript file, because the Open URL or file action will copy the JavaScript file and include it in the Captivate export files. Therefore, when we update the code in the JavaScript file, the code in Captivate will be updated the next time we publish.
If multiple actions contain an Open URL or file action, then CpExtra will load all those files. It will attempt to do so in the following order:
- Success action
- Failure action (or last attempt action)
- On focus lost action
While CpExtra attempts to load the files in this order, they will actually run when they are downloaded. If the first file is 200kb but the second file is 2kb, it's possible the second file will be downloaded and run before the first file.
You can use a list of objects to load multiple files:
Assign | xprefInitLoadJSFromAction with interactive_object1, interactive_object2
You can also load multiple files using a #syntax query. @syntax will not work.
Assign | xprefInitLoadJSFromAction with interactive_object#
# See Also
# xprefInteractiveWebObjects
# Parameters
| (1) Boolean (default: true) |
|---|
| Whether to allow Web Objects to hear mouse events |
# Description
Web Objects allow you to load a web page within Captivate. Let's say you had a button in that web page waiting to be clicked. By default, that button will be unable to hear your click. However, with this variable enabled, that button will be able to register your click along with all other mouse actions like rollover and rollout!
Sounds like the sort of thing you'd want on all the time. Well guess what, it is! By default CpExtra will enable this behaviour. It is possible that this could lead to unforeseen errors within Captivate. Therefore, this command variable exists so you can turn this behaviour off like so:
Assign | xprefInteractiveWebObjects with false
But why does Captivate prevent web objects from hearing mouse events in the first place? This has to do with the weird way Captivate goes about detecting mouse events. Every slide object has an invisible DIV laid on top of it and Captivate listens for mouse events on this DIV. However, for Web Objects this DIV blocks mouse events getting down into the iframe's level. CpExtra merely hides this DIV to allow mouse events to pass through.
If you're reading this part of the documentation then you must be a true believer. So here's a secret no one else knows. There are two undocumented command variables called xcmndHideNonContentDivs and xcmndShowNonContentDivs. Assign either of these variables the name of a slide object to enable/disable the invisible DIV above that object. These variables are not documented because it would be too hard to explain when and where you would ever use them. Because the answer is: When you encounter the issue, you'll know.
Feel free to send me a message to let me know you are a true believer.
# xprefMultichoiceRolloverColor
# Parameters
| (1) Hexadecimal color |
|---|
| The hexadecimal code (e.g. #00FF00) of the color you wish to appear when rolling over an answer option in a multiple-choice or multiple-answer question. |
# Description
When you roll over any answer option in a Captivate Multiple-Choice, Multiple-Answer or True / False question slide, you will see the answer's background change to a different color. However, the default rollover color is a rather dull medium grey, and there is currently no default option in Captivate's quiz settings to configure this for a different color. xprefMultichoiceRolloverColor and it's twin brother xprefMultichoiceRolloverOpacity allow Captivate developers to take back creative control of this area.
# Use cases
Imagine you have a client or manager that is unhappy with the default quiz question background highlight color.
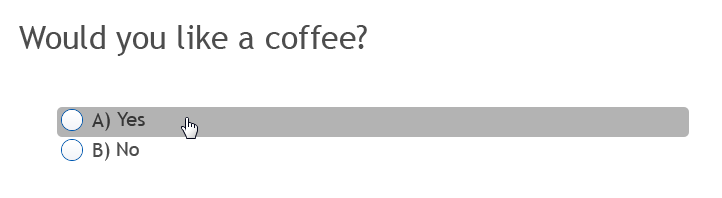
Assigning xprefMultichoiceRolloverColor with a hexadecimal color value will change the color of this highlight.
For example, to change the highlight's color to green, you would assign xprefMultichoiceRolloverColor with the following code (the color code must start with a # character):
#00FF00
# See Also
# xprefMultichoiceRolloverOpacity
# Parameters
| (1) Number |
|---|
| The opacity percentage (e.g. 50 for 50%) of the background color displayed when rolling over a multiple-choice question's answer option. |
# Description
When you roll over any answer in a Multiple Choice or True / False question type, you will see the answer's background highlight color appear. By default this will be a rather unattractive solid medium gray color.
To change the background color from a solid color to a transparent color, assign xprefMultichoiceRolloverOpacity with a number value between 0 (completely transparent) and 100 (completely opaque). (The xprefMultichoiceRolloverColor preference variable gives control of the background color, but does not alter the opacity of the color.)
# See Also
# xprefOrientationChangeTransition
# Parameters
| (1) Number (default: 0.5) | (2) Color (default: #FFFFFF) |
|---|---|
| Seconds duration of fade out animation. | When screen orientation changes, the whole page will turn a certain color. Set that color here |
# Description
When it comes to responsive projects, changing the mobile device orientation (from portrait to landscape / landscape to portrait) can look quite jumpy and therefore unprofessional. When this preference variable is defined, when the mobile device orientation changes, CpExtra will put up a full color 'shield' which temporarily blocks the learner's view of the stage as it rearranges. That shield will then gradually fade out, revealing the neatly reorganized slide.
# Use case
Unlike most CpExtra preference variables, just defining the variable enables the functionality
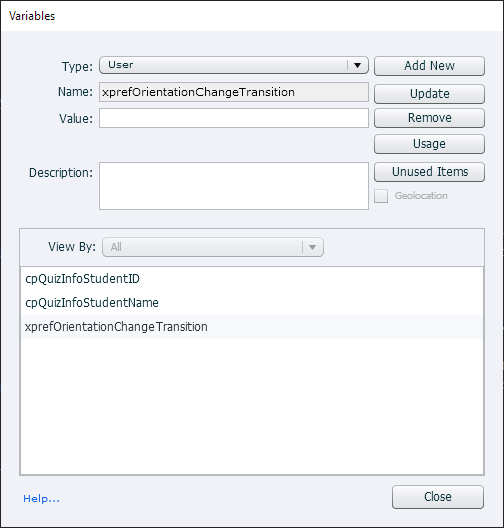
Although in the above picture we have not given xprefOrientationChangeTransition any parameters, you will still see an animation play in the Captivate export.
By default the fade-out animation will be half a second. If you think this is too slow/fast, the first parameter sets the fade out time. For example, to change the fade out time to five and a half seconds, you can write:
Assign | xprefOrientationChangeTransition with 5.5
Also, the default color of the 'shield' is white. If this does not look right in your project, you can change it to another color with the second parameter. For example, to change the shield's color to black, you can assign the hex value of black (#000000) to the second parameter.
Assign | xprefOrientationChangeTransition with 5.5, #000000
# xprefPreventTEBOverwrite
# Parameters
| (1) Boolean (default: false) |
|---|
| Determines whether all Text-entry box in the project display the current value of their associated variables. |
# Description
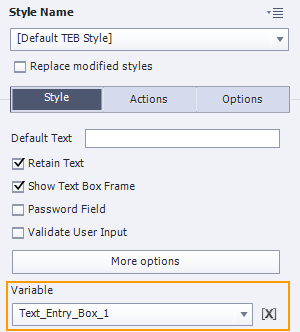
All Captivate Text-entry boxes (or TEBs for short) have an associated variable, which can be found named in the TEB's Properties tab at this location:
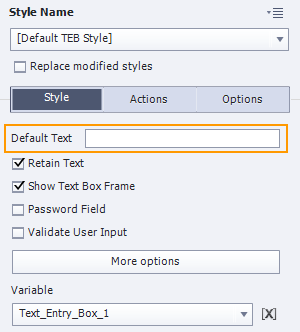
Any text characters the user types into a TEB are instantly written to its associated variable. However, TEBs also have default text, which is entered into Properties at this location:
Captivate's default behaviour when returning to a slide with a TEB is to show its default text rather than the current value of its associated variable, which is not always what developers or learners expect to happen. xprefPreventTEBOverwrite allows Captivate developers to control this behaviour, but only across all TEB in the project.
# Use cases
Let's say a user enters text into a TEB, then moves to a different slide, then moves back to the slide with the TEB again, what text should they see in the TEB? The text now stored in the associated variable or the default text. The answer is: It depends... In some cases you want the values shown in the field to revert back to default, while in other cases you want the entered text to be retained instead.
For example, if a learner completes an interaction using TEBs where they just entered a lot of information into form fields (i.e. TEBs, after exiting that slide and returning to it later many learners would be rather frustrated to find all the information they had painstakingly written out seemingly erased (even though it is actually safely stored in the associated variables).
In such a situation, by assigning xprefPreventTEBOverwrite to true, TEBs will always show the values stored in their associated variable instead of the usual default text.
Note
This preference variable was originally created for earlier Adobe Captivate versions that did not have the Retain text for TEBs now found in recent Cp versions. Before implementing xprefPreventTEBOverwrite in a project you should at least try the default options now provided to see if this provides a viable solution.
# See Also
# xprefStartSlide
# Parameters
| (1) Slide label, number or @syntax query |
|---|
| Determines what slide the movie will start on |
# Description
When developing your course, you often want to view a published version of the slides you're currently developing. Most of the time you can be done by using the Preview > Publish Next 5 Slides option.
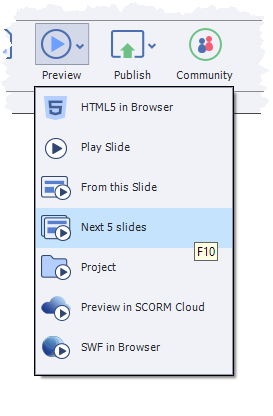
However, sometimes this option will not work for you. For example, what if you were using xcmndCallActionOn to run the action of a button located on slide 1, but you're currently testing slide 20. The only way you could successfully test this scenario would be to preview the entire project. However, this would mean you'd need to labouriously work your way through the export until you got to slide 20.
Instead, you can define xprefStartSlide and within the variables dialog assign it the number of the slide you wish to view.
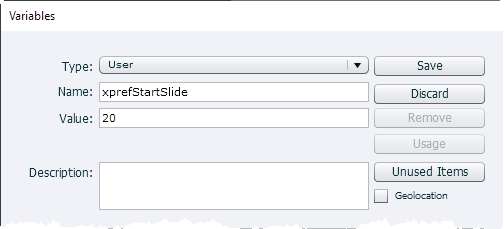
However, the slide you're currently testing can change dozens of times in one day. To avoid having to go into the Project > Variables... dialogue each time, CpExtra also allows you to assign xprefStartSlide with an @syntax query.
Let's say you assigned xprefStartSlide with @_start.
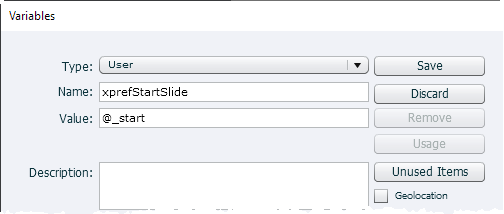
Likely, you do not have any slides in your project whose names end in _start. Therefore, xprefStartSlide will not take any action in the published movie.
However, if you renamed one of your slides to match the @syntax query like so:
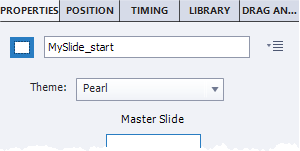
Then CpExtra will automatically jump to that slide at the start of the project. Once you've finished testing that slide, delete the _start from the end of the slide label. To test another slide, add _start to the end of its label.
It is possible CpExtra will find multiple slides which match the @syntax query. Under those circumstances, CpExtra will jump to the slide that appears earliest in the movie. You may encounter this behaviour if you forget to remove the _start suffix from a slide you've finished testing.
xprefInitAction
Please note that xprefInitAction will run before this variable triggers the move to another slide.
# See Also
# xprefTEBUpdateFromVariable
# Parameters
| (1) Boolean (default: false) |
|---|
| Determines whether all Text-entry boxes will automatically display the latest value of their associated variable. |
# Description
Text entry boxes (or TEBs for short) all have an associated User Variable which is created when the object is first added to the slide. By default this User Variable is normally created with exactly the same object name as its associated TEB.
Any text the user enters into the TEB is immediately written to the variable to update its value. However, this does not work both ways. By default, if you change the value of the associated variable the text displayed in the TEB's will not update to reflect that change.
Assigning xprefTEBUpdateFromVariable to true will ensure all TEBs update as needed to accurately display the current value of their associated variable at all times.
When I move back into the slide the Text Entry Box is empty!
Try enabling xprefPreventTEBOverwrite. The two variables contribute to each other.
# See Also
# xprefUseDoubleDigitElapsedTimeValues
# Parameters
| (1) String (default: none) |
|---|
| Determines which increments of time (hours, minutes, seconds) project time info variables will display with double-digits. |
# Description
xprefUseDoubleDigitTotalTimeValues has a special relationship with the following CpExtra info variables:
These variables are typically used to create custom playbars in Captivate projects where project duration timing is shown.
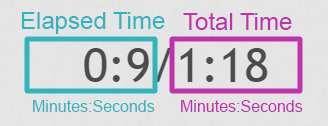
Each info variable listed above displays a number between 0 and 59. When the time digit is between 0-9 the variable normally displays just one digit. When it is between 10-59 the variable displays two digits. However, as numbers change from single to double digits the playbar's total time value also changes length, which the user may find distracting.
The preferred appearance is to have digits 0-9 show a 0 in front of their values (e.g. 00, 01, 02, 03, etc). You may wish this to happen when displaying seconds but not for minutes. xprefUseDoubleDigitTotalTimeValues allows the Captivate developer to configure this display.
Three valid values for xprefUseDoubleDigitTotalTimeValues are:
- Hours
- Minutes
- Seconds
# Use cases
The default value of xprefUseDoubleDigitTotalTimeValues is: None. Which looks like this:
To make double digits appear for both minutes and seconds values assign xprefUseDoubleDigitTotalTimeValues with the following:
Assign | xprefUseDoubleDigitTotalTimeValues with Minutes, Seconds
# See Also
- xprefUseDoubleDigitElapsedTimeValues
- xinfoProjectTotalSeconds
- xinfoProjectTotalMinutes
- xinfoProjectTotalHours
# xprefUseDoubleDigitTotalTimeValues
| (1) String (default: none) |
|---|
| Determines which increments of time (hours, minutes, seconds) the elapsed time info variables will display with double-digits. |
# Description
xprefUseDoubleDigitElapsedTimeValues has a special relationship with the following CpExtra info variables:
These variables are typically used to create custom playbars in Captivate projects where the elapsed time is shown.
Each variable will display a number between 0 and 59. When the time can be represented by single digits between 0-9 the variable will normally display just one digit. When it is between 10-59 the variable displays two digits. However, as numbers change from single to double digits the playbar's elapsed time value also changes length, which the user may find distracting.
The preferred appearance is to have digits 0-9 show a 0 in front of their values (e.g. 00, 01, 02, 03, etc). You may wish this to happen when displaying seconds but not for minutes. xprefUseDoubleDigitElapsedTimeValues allows the Captivate developer to configure this display.
The three valid values are:
- Hours
- Minutes
- Seconds
# Use cases
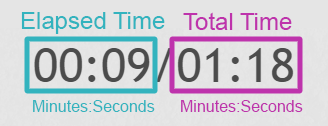
The default value of xprefUseDoubleDigitElapsedTimeValues is: None. Which looks like this:
To make double digits appear for both minutes and seconds values assign xprefUseDoubleDigitElapsedTimeValues with the following:
Assign |xprefUseDoubleDigitElapsedTimeValues with Minutes, Seconds
# See Also
- xprefUseDoubleDigitTotalTimeValues
- xinfoProjectElapsedSeconds
- xinfoProjectElapsedMinutes
- xinfoProjectElapsedHours
# xprefWakeLock
# Parameters
| (1) Boolean (default: false) |
|---|
| Boolean value (true/false) to determine if you want to prevent screen dimming |
# Description
Mobile phones and tablets behave differently to computer screens in that they self-dim after a certain amount of time with no activity. Often eLearning courses have the learner watching playback for minutes without interaction. This might lead to annoyance as the learner must constantly tap the screen to stop it dimming.
Enabling this variable with a positive value (like true or 1) will prevent the learner's screen from dimming. Bare in mind that this will also cause the learner's battery to drain faster.
WARNING
Wake lock will not kick in as soon as xprefWakeLock variable is enabled. Due to the browser technology involved, the learner must click or tap the screen after xprefWakeLock is enabled before it takes effect.
This functionality was implemented using Rich Tibbett's No Sleep javascript library. (opens new window) Use of this library is extended under the MIT liscense seen below:
NoSleep license
The MIT License (MIT)
Copyright (c) Rich Tibbett
Permission is hereby granted, free of charge, to any person obtaining a copy of this software and associated documentation files (the "Software"), to deal in the Software without restriction, including without limitation the rights to use, copy, modify, merge, publish, distribute, sublicense, and/or sell copies of the Software, and to permit persons to whom the Software is furnished to do so, subject to the following conditions:
The above copyright notice and this permission notice shall be included in all copies or substantial portions of the Software.
THE SOFTWARE IS PROVIDED "AS IS", WITHOUT WARRANTY OF ANY KIND, EXPRESS OR IMPLIED, INCLUDING BUT NOT LIMITED TO THE WARRANTIES OF MERCHANTABILITY, FITNESS FOR A PARTICULAR PURPOSE AND NONINFRINGEMENT. IN NO EVENT SHALL THE AUTHORS OR COPYRIGHT HOLDERS BE LIABLE FOR ANY CLAIM, DAMAGES OR OTHER LIABILITY, WHETHER IN AN ACTION OF CONTRACT, TORT OR OTHERWISE, ARISING FROM, OUT OF OR IN CONNECTION WITH THE SOFTWARE OR THE USE OR OTHER DEALINGS IN THE SOFTWARE.