# Command Variables
Command Variables are so named because they represent a specific 'action' or 'command'. When you assign a value to these variables, CpExtra reads that value and acts upon it. CpExtra Command Variables are actually designed to work in the same way as Captivate's own Command Variables. But while Captivate's Command Variables are actually System Variables, not User Variables, CpExtra makes it possible for Captivate e-learning developers to add to Captivate's functionality by setting up new User Variables and giving them names that CpExtra will recognise and execute as a Command Variable.
Below is a list of all the Command Variables offered by CpExtra (in alphabetical order) and what they do.
# xcmndAddEventListener
# Parameters
| (1) Slide Object Name | (2) Event | (3) Interactive Object Name | (4) Criteria (default: success) |
|---|---|---|---|
| Name of the slide object on which you want to listen for an event. | Name of the event for which the event listener should listen. | Name of an interactive slide object that has been set up to execute one or more actions (e.g. a button set up to execute one action for a success event and another action for a failure event). | Which of the interactive object's run-time events the event listener should use to trigger an action (e.g. success, last attempt). |
# Description
Adds and event listener to a slide object. The important thing to understand here is that the action that the event listener executes needs to be set up beforehand on another interactive object that exists somewhere in the same CPTX project file. In Captivate, a typical interactive object can usually execute more than one action. For example it might have one action executed on a success event, and a different action executed when its on last attempt event fires (essentially a failure event). It is this other object's events and actions that basically get 'hijacked' and executed by the CpExtra event listener.
Captivate's interactive object are not limited to executing simple actions such as show or hide but can also execute very complex Advanced Actions and Conditional Advanced Actions. CpExtra event listeners now make it possible to create very sophisticated interactions that are triggered by events Captivate does not support by default.
TIP
xcmndAddEventListener and #syntax make for a very powerful combination which essentially allows Captivate developers to create a new subset of slide objects that each have its own special behaviour.
# See Also
# xcmndAlert
# Parameters
| (1) String | (2) String | (3) Interactive Object Name | (4) Criteria (default: success) |
|---|---|---|---|
| Content of the alert box message. | The alert box title. | Name of an interactive slide object that has been set up to execute one or more actions (e.g. a button set up to execute one action for a success event and another action for a failure event). | Which of these event-based actions you wish to trigger when the alert box OK button is clicked or tapped. |
# Description
Causes an alert dialog box to appear. While an alert box is easy enough to achieve in Captivate by executing a simple JavaScript snippet such as alert("My message."); this alone does not provide an easy way to configure the appearance or functionality of the alert box.
CpExtra's xcmndAlert command variable allows the title text, message text and action executed by the OK button to be all configurable. This makes it not only a very useful method of providing feedback to a user but also a way of debugging interactions that rely on user variables.
However, it is important to know a little about how the parameters need to be specified. So, read on...

# Message parameter
The first parameter specified for xcmndAlert defines the string of text that appears as the message in the main section of the alert box.
For example, the following code...
Assign | xcmndAlert with This is my message
...will cause this alert dialog to appear on screen:
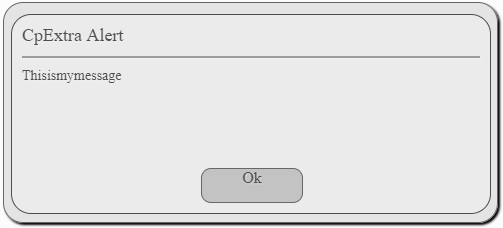
Notice how the spaces have been removed from the text string? This is because CpExtra by default will remove all white space characters when assignments are made to command variables.
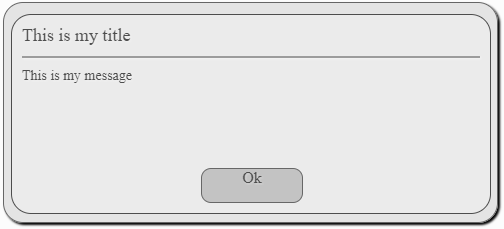
To get around this default behaviour and show the text as an easily readable string you simply need to use square brackets to designate a string.
Assign | xcmndAlert with [This is my message]

# Title parameter
If you don't want the title of the alert box to always be CpExtra Alert you can change the alert box title text by adding the second parameter when assigning the value for the xcmndAlert command variable.
Assign | xcmndAlert with [This is my message], [This is my title]
# Including variable values in a parameter
Alert boxes are very useful used for debugging Advanced Actions and especially for Conditional Advanced Actions which can get very complex. Often you want to know what the value of a certain variable was at a certain point of the Advanced Action.
To assist with this both the first and second parameters of xcmndAlert allow you to include variable values as part of the parameter.
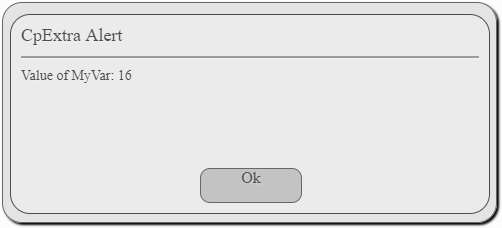
Let's say we have a variable called MyVar. We can use double dollar signs to trace out the value of MyVar.
Assign | xcmndAlert with [Value of MyVar: $$MyVar$$]
From the result below we can see that MyVar currently equals 16
# Alert box OK button action parameter
It's possible that you want a special action to run after tapping the alert's Ok button. As explained here CpExtra can only call an action if it is associated with an interactive object's criteria. So, the third parameter that can be assigned to the xcmndAlert command variable specifies the name of the interactive object (e.g. a button or text-entry-box) that has already been set up in the project with a specific action or advanced action you want executed when the alert box Ok button is clicked or tapped.
# Event parameter
The fourth and final parameter of xcmndAlert specifies which run-time event (of the interactive object specified in the third parameter) you wish to trigger. If no value is specified for this paraemeter it will default to success because all of Captivate's interactive objects have at least a success event. However, other typical events you might use for certain objects include:
- last attempt
- fail
- focus lost (for Text-Entry-Boxes only)
Essentially the third and fourth parameters for xcmndAlert are the same as those for xcmndCallActionOn which is explained below.
# xcmndAllowTabOut
# Parameters
| (1) Text Entry Box Name |
|---|
| The text entry box you want to stop using xcmndPreventTabOut's special functionality |
# Description
This command variable exists purely to turn of xcmndPreventTabOut's functionality. Please click the link below to xcmndPreventTabOut's help section for more information about what it does.
# See Also
# xcmndCallActionOn
# Parameters
| (1) Interactive Object Name | (2) Criteria (default: success) |
|---|---|
| Name of slide object that holds a success/failure action | Which action you wish to trigger |
# Description
This command variable was created to allow Captivate developers to 'daisy chain' Advanced Actions by calling one action from another, something not possible by default in Captivate. This page explains the reasons why Advanced Action chains need to be set up this way
Example: If you have a button named Button_1 and you desire its success action to run, you can do so with the following code:
Assign | xcmndCallActionOn with Button_1, success
If the second parameter is not specified, xcmndCallAction on will by default trigger the object's success action (which in practice is usually what you would want to do anyway).
So the code below will effectively give the same result as the code above.
Assign | xcmndCallActionOn with Button_1
About run-time events
Most interactive objects in Adobe Captivate come with at least two run-time events:
- Success
- Last attempt (usually regarded as a failure event but given this name because multiple attempts may have been involved before final failure)
These objects include Text Buttons, Shape Buttons, Image Buttons, Smart Shape Buttons, and Click Boxes.
However, Text-Entry Boxes (or TEBs for short) come with a third event:
- Focus lost
This can be useful if you encounter a situation where you need to set up three different event listeners to execute actions but you only want to use one interactive object. To achieve this would normally require setting up actions on at least two buttons. But using a TEB gives you three usable events. Although it's not a commonly used event, you can specify a TEB's focus lost event as a parameter using the code shown below:
Assign | xcmndCallActionOn with Text_Entry_Box_1, onfocuslost
Note that there can be no spaces in the name of the run-time event when you specify it as a parameter. So, if using the last attempt event, it should be written as lastattempt.
# xcmndCeil
# Parameters
| (1) Variable Name |
|---|
| Name of the variable whose value should be rounded up (@syntax available) |
# Description
This Command Variable takes another variable's decimal number (e.g. 1.23), rounds it up to the nearest whole number, and then re-assigns the new rounded number value back to the same variable. This is a very useful solution for situations where you are doing math that results in a number followed by several decimals, but where the next highest whole number is required.
# Examples
- 3.3 will be rounded up to 4
- 6.6 will be rounded up to 7
- 1.5 will be rounded up to 2
You can run xcmndCeil on multiple variables at once by simply assigning a comma delimited list as its value as follows:
Assign | xcmndCeil with MyVar1, MyVar2, MyVar
If you were to assign the value of xcmndCeil as an @syntax query, then all variables with a name that match the query would be reassigned with values rounded up to the nearest whole number.
Assign | xcmndCeil with MyVar@
Common issue with assigning a direct variable name
Please see this page for an explanation of an issue that happens when you assign a direct variable name to another variable.
# See Also
# xcmndChangeState
# Parameters
| (1) Slide Object Name | (2) State Name |
|---|---|
| The slide object whose Object State you wish to change. (@syntax or #syntax can also be used to specify the object name.) | The name of the Object State that should be made active. |
# Description
This Command Variable changes the Object State of a slide object to another state already defined for that object.
Example: To assign a shape called SmartShape_1 with a new state called MyNewState, use the following code:
Assign | xcmndChangeState with SmartShape_1, MyNewState
Why not just use Captivate's default Change State action?
For one, xcmndChangeState can use @syntax or #syntax to change the state of multiple objects with a single variable assignment.
Secondly, xcmndChangeState allows you to use other variables to dynamically select the object or state you wish to change. For example, you could use xinfoEventTarget to change the state of an object the user just clicked.
Pssst!
Have you tried CpExtra's Smart States? They're really good time savers for developers.
# See also
# xcmndCompleteSlide
# Parameters
| (1) Number/Number Range/Slide Label/Slide label range |
|---|
| The slide or slides you wish to mark as completed. |
# Description
This variable marks a slide as having been visited and therefore completed. This command variable can be very useful in achieving artificial slide completions because Captivate offers no way to complete a slide other than by forcing users to visit the actual slide/s.
# Use cases
A completed slide will appear with a tick mark next to it in the Table of Contents or TOC. Even though some slides are not required to be visited, you may still want them to appear marked off in the TOC (e.g. navigation HELP slides). If slides are grouped together, only one item representing the entire group may appear in the TOC and all slides in the group must be visited in order for the entire group to be marked as completed.
Slide completions are also often used as criteria for marking a SCORM module as having been completed for LMS reporting. So, the xcmndCompleteSlide command variable can be used to artificially mark all slides as having been completed at a certain point, thereby avoiding module completion failures that often occur due to some slides not having been visited by the learner.
Captivate developers will usually find this command variable essential when designing courses that use branching scenarios as it be used to ensure completion even though the learner did not visit every slide. Simply configure xcmndCompleteSlide to mark all slides as complete when the learner successfully completes the scenario. This can avoid unexpected behaviours in the TOC and SCORM LMS.
# Specifying slide numbers
If you assign xcmndCompleteSlide with a slide number, such as 5...
Assign | xcmndCompleteSlide with 5
...then the fifth slide in the project will be marked as complete.
To mark a number of non-contiguous (i.e. separated) slides as complete, use a comma-delimited list. For example, to mark the fifth and tenth slides complete, use the code shown below:
Assign | xcmndCompleteSlide with 5, 10
To mark all slides in a contiguous (i.e. uninterrupted) range, specify the range by showing the starting and ending slide separated by a hyphen as shown below:
Assign | xcmndCompleteSlide with 5 - 10
# Using slide labels instead of slide numbers
If you add and remove slides from a course module during development, some slide numbers will change. This would then require you to revisit and edit slide numbers or slide ranges specified in parameters for xcmndCompleteSlide. A much more stable way of working is by assigning slide labels instead.
For example, if you want to mark a slide called MenuPage complete you'd write the following:
Assign | xcmndCompleteSlide with MenuPage
You can also define the start and end slides for a range of contiguous slides using slide labels separated by a hyphen.
Assign | xcmndCompleteSlide with MenuPage - Conclusion
The 'all' keyword
xcmndCompleteSlide recognizes a special keyword: all (not case-sensitive) that allows you to mark all slides in a course module as complete with just one assignment as shown below:
Assign | xcmndCompleteSlide with all
Warning: Slide labels including spaces
You may run into an issue when trying to complete a slide whose name has a space in it. This is because spaces are automatically removed in assignment parameters of command variables. To preserve the spaces in slide names you will need to surround the slide name with square braces like these []. See this page for more information
# xcmndDisable
# Parameters
| (1) Interactive Object Name |
|---|
| The interactive object you want to disable. (@syntax and #syntax can also be used to specify the disabled object.) |
# Description
An interactive object is a slide object that can execute actions. In Adobe Captivate interactive objects include:
- Buttons (text, transparent, or image)
- Shape buttons (A smart shape marked as a button)
- Click boxes
- Text entry boxes
Interactive objects can be enabled or disabled. A user is unable to interact with a disabled object.
- A disabled button, shape button or click box will not respond to a click or tap (on a mobile device).
- A disabled Text-entry Box will not allow the learner to enter or submit text.
To disable one or more interactive objects, assign xcmndDisable with the object's name, a list of names, or an @syntax or #syntax query that would include the names.
# See also
# xcmndDisableMouseEvents
# Parameters
| (1) Slide Object Name |
|---|
| The name of the interactive slide object you want to ignore mouse interaction. (@syntax and #syntax can also be used to specify objects.) |
# Description
Assigning a slide object name to xcmndDisableMouseEvents will cause that slide object to ignore all mouse interactions, including rollover, click and double-click.
# Use cases
Let's say you had two interactive slide objects, one on top of the other:
- Button_top
- Button_bottom
Normally, if you click Button_top, it would hear the mouse click, respond to it, and block Button_bottom underneath from responding (because visually Button_top is on a higher layer).
However, if you disable Button_top's mouse events as follows...
Assign | xcmndDisableMouseEvents with Button_top
...then the next time you click Button_top it will ignore the mouse click and button_bottom will respond to the click instead because it is no longer blocked by Button_top.
xcmndDisableMouseEvents is quite different to xcmndDisable. With xcmndDisable the slide objects will still hear mouse events (such as through xcmndAddEventListener), but they will not respond to them.
Regarding xcmndAddEventListener
When a slide object's mouse events have been disabled, event listeners listening for the following events will not respond:
- mousedown
- mouseup
- rollover
- rollout
- mousemove
- click
- doubleclick
- rightclick
Internet Explorer incompatibility
xcmndDisableMouseEvents requires a CSS style which is part of the HTML5 standard. Internet Explorer does not implement this part of the HTML5 standard. Therefore, this command variable does not work with Internet Explorer even when the IE version claims to be HTML5-ready.
# See Also
# xcmndEmbedFontFromAction
# Parameters
| (1) String | (2) Interactive Object Name | (3) Criteria (default: success) |
|---|---|---|
| Full name of the font you wish to embed. (must include spaces, therefore use square brackets) | The interactive object that is loading a font file with a Open URL or File action | Which of the interactive object's actions contains the Open URL or File action (e.g. success, last attempt). |
# Description
Our computers are loaded out with a great variety of fonts. When writing documents, we often do not need to be careful about which fonts we pick. We just assume what we see on our computer is what everyone else will see on their devices. However, when it comes to mobile devices, the number of fonts loaded by default is extremely limited and definitely not consistent between manufacturers. Therefore, there is a certain list of web safe fonts (opens new window). These are fonts you can reliably use, because they are loaded on practically every device. However, sometimes these fonts are not enough. Perhaps you are designing a course in Chinese, Japanese or Korean and need to use a font that supports that language? Or what if the design of your course requires you to use a fancy non-web safe font?
If you're working with a regular Captivate project, this may not be an issue for you. When you export a regular Captivate project the text is converted to vector graphics. Therefore, you can use any font you want. The exceptions to this are when the text is 'dynamic', meaning it might change. Examples of this are Text Entry Boxes or Captions which display User Variables. These need to be rendered as live text using font files. If dynamic text is set to use a font which is not loaded on the learner's system, then it will default back to a web safe font. However, this means your learner's experience might change from device to device.
This issue is further compounded with responsive projects. Because of the variable screen size, text needs to be kept live so that it can wrap if the screen size gets too small.
The solution to all of these above issues is font embedding. This is where you include the font file (.ttf, .woff, .woff2) as part of your webpage. The learner will download the font file along with the web page and the device will use that font file to render the text. CpExtra allows you to do this using xcmndEmbedFontFromAction using a very similar technique to xcmndLoadJSFromAction
# Set Up
- Include some text in your course using a non-web safe font. Make a note of that font's name. (For this example we'll use Courier Prime)
- Add an Interactive Object anywhere in your project.
- Give that Interactive Object a memorable name. (for this example we'll call it font_embedder)
- Set the Interactive Object's success/failure/on focus lost action to Open URL or File.
- Click the folder icon. In the browser window that appears, navigate to your font file and select it. (Please note, currently only .ttf, .woff and .woff2 files are supported) This slide object is now fully configured.
- xcmndEmbedFontFromAction needs to be run from somewhere. Presumably this would be your project's xprefInitAction so that the font is ready to be used from the very start of your project. Where-ever you're planning to run xcmndEmbedFontFromAction, go there.
- Assign xcmndEmbedFontFromAction with:
- The name of the font.
- The name of the Interactive Object created in step 2.
- The criteria of the Interactive Object which runs the Open URL or File action (If not defined, this will default to success)
Assign | xcmndEmbedFontFromAction with [Courier Prime], font_embedder
What's with the []?
In the example above, the name of our font is Courier Prime. Note the space character between Courier and Prime. That space character is central to the name. Without it, we would not be able to correctly identify what objects are using the Courier Prime font.
However, as discussed here, when you make an assignment to a CpExtra command variable, CpExtra automatically removes all whitespace characters (spaces and tabs). Therefore, an assignment like this...
Assign | xcmndEmbedFontFromAction with Courier Prime, font_embedder
...would target any objects using the CourierPrime font. Which we're guessing is none.
The work around to preserve the space character is to declare the parameter as an explicit string. This is acheived using the [ square bracket ] characters.
Testing font embedding
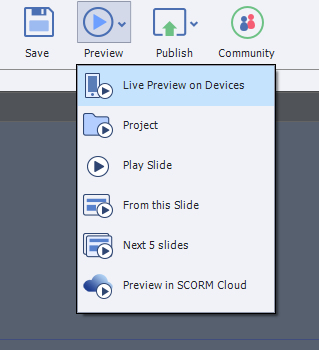
Font embedding can be difficult to test, because you are obviously going to use a font that is already loaded on your system. With responsive projects, to ensure *xcmndEmbedFontFromAction is working as expected, try using Preview > Live Preview on Devices. This allows you to view the Captivate export on a mobile device connected to your local network. Likely, this mobile device does not have the font you wish to use. Therefore, if you see that font displaying correctly, you know xcmndEmbedFontFromAction has been set up correctly.
# See also
- xcmndLoadJSFromAction
- You will probably want to use this with xprefInitAction so that fonts are loaded from the very start of the course.
# xcmndEnable
# Parameters
| (1) Interactive Object Name |
|---|
| The name of the interactive slide object you want to enable. (@syntax and #syntax can also be used to specify the name of the object.) |
# Description
This command variable is the opposite of xcmndDisable. It re-enables an interactive object after it has been disabled.
# See also
# xcmndEnableMouseEvents
# Parameters
| (1) Slide Object Name |
|---|
| The name of the interactive slide object you want to respond to mouse interaction. (@syntax and #syntax can also be used to specify object name/s.) |
# Description
If an object's mouse events have been disabled with xcmndDisableMouseEvents, then this command variable can be used to re-enable mouse events for those objects.
# xcmndFloor
# Parameters
| (1) Variable Name |
|---|
| Name of the variable whose decimal number value should be rounded down to the nearest whole number. (@syntax can also be used to specify variable names.) |
# Description
This commmand variable takes the decimal number value of a specified variable and rounds the number down to the nearest whole number, before finally assigning the newly-rounded number back to the same variable.
# Examples
- 3.3 will be rounded down to 3
- 6.6 will be rounded down to 6
- 1.5 will be rounded down to 1
To run xcmndCeil on multiple variables at once, assign a comma delimited list of variable names:
Assign | xcmndFloor with MyVar1, MyVar2, MyVar
You can also use an @syntax query to round up values for all variables that have names matching the query. For example, to round up the values of all variables with names beginning with MyVar use the following code:
Assign | xcmndFloor with MyVar@
Common issue with assigning a direct variable name
Please see this page for an explanation of an issue that happens when you assign a direct variable name to another variable.
# See Also
# xcmndFlushStorage
# Parameters
| (1) Variable Name |
|---|
| Name of the local/session storage variable whose records should be 'flushed', i.e. cleared. (Special keywords: local, session, all) |
# Description
Assigning xcmndFlushStorage the name if a storage variable will clear that variable's value from the browser and prevent that variable's value from being saved to storage for the duration of the current project.
Click here to learn more about storage variables.
# Use cases
When building interactions using local storage variables you may at some times want to see what the project will look like to someone who has never viewed it before. However, it can be difficult to do that when your browser has recorded the variable's values from previous user sessions. xcmndFlushStorage allows you to wipe a variable's records from storage. This means the next time you view the project, you will see what a learner would see on their first time working through the content.
To flush a single variable, assign xcmndFlushStorage with the variable's name:
Assign | xcmndFlushStorage with [ls_localStorageVariable]
Common issue with assigning a direct variable name
Please see this page for an explanation of an issue that happens when you assign a direct variable name to another variable.
It is due to this issue that we made the above assignment using square brackets around the variable name.
You can flush multiple variables with a comma-delimited list of variable names:
Assign | xcmndFlushStorage with ls_localStorageVariable, ss_sessionStorageVariable
xcmndFlushStorage also recognizes the keyword Local (not case-sensitive). Assigning this will **clear all local storage variables (the ones starting with LS_)
Assign | xcmndFlushStorage with Local
In the same way, assigning the Session keyword (not case-sensitive) will flush all session storage variables (the ones starting with SS_)
Assign | xcmndFlushStorage with Session
If, on the other hand, you wanted to clear all storage variables irrespective of type, you can assign the All keyword (not case-sensitive).
Assign | xcmndFlushStorage with All
# See Also
# xcmndGotoSlide
| (1) Slide Label or Number |
|---|
| Numble or label of slide you wish the movie to immediately jump to |
# Description
Assigning xcmndGotoSlide the label or number of the slide will cause Captivate to immediately jump to that slide.
This is very similiar to Captivate's native cpCmndGotoSlide command variable. However, cpCmndGotoSlide does not work with slide labels.
# xcmndHeight
# Parameters
| (1) Variable name | (2) Slide Object Name |
|---|---|
| The variable that will store the slide object's height dimension for later use. | Name of the slide object whose height dimension you need to store. |
# Description
xcmndHeight gets the height dimension (in pixels) of the slide object named in the second parameter and assigns that number to the variable named in the first parameter.
At this time there is no 'set mode' for xcmndHeight. It can only get or read an object's height, not change it.
# See Also
# xcmndHide
# Parameters
| (1) Slide Object Name |
|---|
| The name of the slide object you want to hide. (@syntax and #syntax can also be used to specify objects.) |
# Description
When assigned the name of a slide object as its parameter xcmndHide hides the object, even when the slide object is not on the current slide.
Hide multiple objects in one assignment
This can be done with @syntax. For example, the following code will hide all objects where the name begins with SmartShape_ (not recommended because it would likely hide a significant number of objects across all slides):
Assign | xcmndHide with SmartShape_@
You can also assign object names as a comman-delimited list, as follows:
Assign | xcmndHide with SmartShape_1, SmartShape_2, SmartShape_3
# See Also
# xcmndLoadJSFromAction
# Parameters
| (1) Interactive Object Name |
|---|
| The name of an interactive object who's success/failure/on focus lost actions load JavaScript files. (@syntax and #syntax can also be used to specify objects.) |
# Description
When assigned the name of an interactive object, it will check if that object's success, failure or on focus lost action contains an Open URL or file action. If that action points to a .js file, CpExtra will then load and run that JavaScript file.
We use this method rather than pointing directly to a JavaScript file, because the Open URL or file action will copy the JavaScript file and include it in the Captivate export files. Therefore, when we update the code in the JavaScript file, the code in Captivate will be updated the next time we publish.
If multiple actions contain an Open URL or file action, then CpExtra will load all those files. It will attempt to do so in the following order:
- Success action
- Failure action (or last attempt action)
- On focus lost action
While CpExtra attempts to load the files in this order, they will actually run when they are downloaded. If the first file is 200kb but the second file is 2kb, it's possible the second file will be downloaded and run before the first file.
You can use a list of objects to load multiple files:
Assign | xcmndLoadJSFromAction with interactive_object1, interactive_object2
You can use @syntax to load multiple JavaScript files from objects on the current slide, or #syntax to load from objects across the whole project.
Assign | xcmndLoadJSFromAction with interactive_object#
WARNING
The Open URL or file action can be used to point to a JavaScript file on a remote server. Under those circumstances, the JavaScript file will NOT be included in the Captivate export files. When the movie runs, xcmndLoadJSFromAction will still load that file from the remote server. If you have a client who is concerned about security, you may want to avoid this, because they may see requests being made to sites outside their network and believe it is a security leak.
Why didn't you call this xcmndLoadJS?
We would expect a variable called xcmndLoadJS accept file paths to Javascript files, rather than the name of an interactive object. At the time of writing, this would not be a viable variable. However, it may be at some point in the future. So we choose xcmndLoadJSFromAction as a more descriptive name for this variable, and keep xcmndLoadJS in reserve for a possible future command variable.
First On Enter Slide Action
Even if xcmndLoadJSFromAction is triggered from xprefInitAction due to the time needed to download the file, any JavaScript libraries you load likely won't be available from the On Enter action of the first slide. This can be troublesome in LMS or self paced learning projects as there is no way to know ahead of time which slide will be the first. To get around this, we have created xprefInitLoadJSFromAction. Think of this preference variable like a call to xcmndLoadJSFromAction that runs as soon as possible. By as soon as possible, this means even before the learner clicks the opening play button. Any JavaScript code loaded from xprefInitLoadJSFromAction should be ready on the first slide of the Captivate Movie. There are however, some limitation with this. Please see the page for xprefInitLoadJSFromAction for more details.
# See Also
# xcmndMaxScore
# Parameters
| (1) Variable name | (2) Quiz Object Name |
|---|---|
| The variable that will store the quiz object's maximum score for later use. | Name of the quiz object who's maximum score you need to read. |
# Description
xcmndMaxScore is similar to xcmndScore except that, instead of changing or reading an interactive object's quiz score, xcmndMaxScore reads what it's maximum intended score is. i.e. how many points the interactive object would report to the quiz if the learner achieved 100% success on that object.
Within Captivate, the maximum score is set when you select the interactive object, open the Properties panel, scroll down on the Actions subsection, and expand the Reporting submenu.
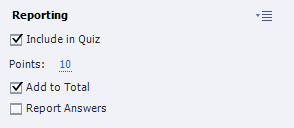
Let's say that the object from the screenshot above has a name of Interactive_Object.
We could use xcmndMaxScore to set InteractiveObject to it's maximum score.
Assign | xcmndMaxScore with MyVar, InteractiveObject
Assign | xcmndScore with InteractiveObject, MyVar
TIP
The above result could also be achieved by using xcmndScore's max keyword (not case-sensitive) as follows:
Assign | xcmndScore with InteractiveObject, max
Let's say we wanted to create an Advanced Action that would set this object to be half its maximum score. Here's how we can do that in conjunction with xcmndScore and xcmndRound (To avoid unexpected decimal places).
Assign | xcmndMaxScore with MyVar, InteractiveObject
Expression | MyVar = MyVar / 2
Assign | xcmndRound with [MyVar]
Assign | xcmndScore with InteractiveObject, MyVar
Just like that we have changed InteractiveObject's score to 5. This code will dynamically change the score of an object in response to its maxium score.
# See Also
# xcmndPosX
# Parameters
# Get Mode
| (1) Variable Name | (2) Slide Object |
|---|---|
| The name of the variable in which to record the object's horizontal position. | The name of the slide object whose horizontal X position should be stored. |
# Set Mode
| (1) Slide Object | (2) Number OR Variable Name |
|---|---|
| The name of the slide object whose horizontal position you want to change (@syntax can also be used to select objects by name.) | The number value that should become this object's new horizontal X position. |
# Description
This is a variable with both a get and set mode. To learn more about interacting with these types of variables, please see this part of the help.
# Use cases for set mode
In set mode this variable allows you to set how many pixels from the left edge of the slide stage the object should appear. The following code would cause an object named SmartShape_1 to immediately move ten pixels away from the left of the stage.
Assign | xcmndPosX with SmartShape_1, 10
@syntax can also be used to select screen objects. For example, let's say you have three objects on the slide:
- SmartShape_1
- SmartShape_2
- SmartShape_3
Since all three objects have names that begin with the same pattern, you could move all three at the same time with the following line of code:
Assign | xcmndPosX with SmartShape_@, 10
# Use cases for get mode
Get mode allows you to read an object's current horizontal X position into a variable. If you wanted to move SmartShape_1 to the same horizontal position as SmartShape_2, you could do so with the following code:
Assign | xcmndPosX with MyVar, SmartShape_2
Assign | xcmndPosX with SmartShape_2, MyVar
Responsive Projects
xcmndPosX and xcmndPosY still try to work in responsive projects, but due to the fluid stage it is a lot more difficult to make the variable work as expected. Therefore, we suggest avoiding the use of xcmndPosX and xcmndPosY in responsive projects (if at all possible).
# See Also
# xcmndPosY
# Parameters
# Get Mode
| (1) Variable Name | (2) Slide Object |
|---|---|
| The name of the variable in which to record the object's vertical Y position. | The name of the slide object whose vertical Y position you want to record. |
# Set Mode
| (1) Slide Object | (2) Number OR Variable Name |
|---|---|
| The name of the slide object whose vertical position you want to change. (@syntax can also be used to select objects by name.) | The number value that should become this object's new vertical Y position. |
# Description
This is a variable with a get and set mode. To learn more about interacting with these variables, please see this part of the help.
# Set mode use cases
In set mode this variable allows you to set how many pixels from the top of the slide the object should appear. The following code would cause an object named SmartShape_1 to immediately move ten pixels down from the top of the slide stage.
Assign | xcmndPosY with SmartShape_1, 10
@syntax can also be used to specify objects by name. Say you had three objects on slide:
- SmartShape_1
- SmartShape_2
- SmartShape_3
Since all objects have names beginning with the same pattern, you could move all three at the same time with the following line of code:
Assign | xcmndPosY with SmartShape_@, 10
# Get mode use cases
Get mode allows you to read the current vertical Y position of an object and save it into a variable. This then allows you to use that value to control the vertical position of another object. For example, if you wanted to move SmartShape_1 to the same vertical position as SmartShape_2, you could do so with the following code:
Assign | xcmndPosY with MyVar, SmartShape_2
Assign | xcmndPosY with SmartShape_2, MyVar
Responsive Projects
xcmndPosX and xcmndPosY still try to work in responsive projects, but due to the fluid stage it is a lot more difficult to make the variable work as expected. Therefore, we suggest avoiding the use of xcmndPosX and xcmndPosY in responsive projects (if at all possible).
# xcmndPreventTabOut
# Parameters
| (1) Text Entry Box Name |
|---|
| The name of the Text-entry Box on which you want to trigger evaluation when the Tab key is pressed. |
# Description
The Tab key is used in many software applications as an accessibility feature, allowing keyboard-driven users to navigate from one input field to another without using a mouse. This is true of the browser that displays Captivate's HTML5 published output. However, using the Tab key can cause some unexpected behaviour at run-time. xcmndPreventTabOut offers a way to work around the resulting usability issues.
Let's say you're using Adobe Captivate to build a software simulation that simulates the normal behaviour of an application where the user needs to:
- Select a Text-entry Box.
- Enter a text string.
- Press the Tab key to move to the next field.
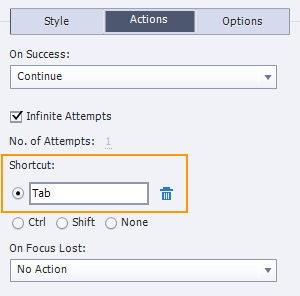
On step 3 you may wish to evaluate the text string entered in step 2 to ensure it is correct. To do so, you may specify Tab in the TEB's shortcut field so that success/failure evaluation will trigger when the user presses the Tab key.
However, in practice what will happen when you test this is that the Tab key will move keyboard focus to the next input element (perhaps the browser search bar) rather than triggering the evaluation of the data entered into the TEB by the user. The underlying issue here is really a timing issue. The keyboard focus leaves the TEB before the keyboard event is registered on the object.
# Use cases
If the name of the TEB is MyTextEntryBox, simply assign xcmndPreventTabOut with the name of the object as follows:
Assign | xcmndPreventTabOut with MyTextEntryBox
xcmndPreventTabOut fixes this timing issue by blocking any change of focus to a different field when the Tab key is pressed. When the TEB then detects that the Tab key was pressed evaluation then happens as expected and TEB's relevant success or last attempt events will fire, executing whatever actions are assigned to them.
Note
Only one TEB at a time can be enabled with xcmndPreventTabOut's special behaviour. This means that, if you are simulating a screen with multiple text-entry fields, you would need to use a different slide for each successive field. You can use the actions assigned to the TEB's success or last attempt events to move from the current slide to the next one in the series.
# See Also
# xcmndRandom
| (1) Variable Name | (2) Number (default: 1) | (3) Number (default: 0) |
|---|---|---|
| Name of a variable to which a random number will be assigned. | The highest possible number value in the random range. | The lowest possible number in the random range. |
# Description
xcmndRandom generates a random number and assigns it to the variable named in the first parameter.
# When only the first parameter is provided
A random decimal number between 0 and 1 will be generated (e.g. 0.1. 0.2).
# When both first and second parameters are provided
A random whole number between 0 and the number specified in the second parameter will be generated (e.g. 1, 2, 3).
# When all three parameters are provided
A random whole number will be generated with a value somewhere between the number specified in the third parameter (i.e. the lowest possible number) and the number specified in the second parameter (i.e. the highest possible number).
# xcmndRemoveEventListener
# Parameters
| (1) Slide Object Name | (2) Run-time Event | (3) Interactive Object Name | (4) Criteria (default: success) |
|---|---|---|---|
| Name of the slide object on which an existing event listener is currently listening for an event. | Name of the event for which the event listener is currently listening. | Name of the interactive slide object whose actions the event listener will execute if it detects the run-time event named in the second parameter. | Name of the run-time event (of the interactive object specified in parameter 3) that the event listener will trigger if it detects the event specified in parameter 2. |
# Description
The xcmndRemoveEventListener command variable basically just does the opposite of its twin the xcmndAddEventListener. It removes a specific event listener from a specific slide object.
# See Also
# xcmndReset
# Parameters
| (1) Variable Name |
|---|
| Name of the variable whose value should be reset to its initial value (@syntax available) |
# Description
Resets variables to the initial default value specified in the Project > Variables dialog).
# Use cases
Let's say you had a form interaction with many Text-entry boxes linked to the following User Variables:
- firstname_field_form
- lastname_field_form
- gender_field_form
- employer_field_form
- paymentmethod_field_form
The learner interacts with the slide, entering the required information into each field. Later, they may want to return to the slide and work through the interaction again. This means you'll need to reset it to its initial state, and this will likely mean that most if not all of the variables involved will need to be reset to default values again.
You could reset firstname_field_form to its original value by assigning xcmndReset with this code:
Assign | xcmndReset with firstname_field_form
However, to be more efficient, you could reset all the variables in the interaction with one @syntax assignment as follows:
Assign | xcmndReset with @_field_form
# xcmndRound
# Parameters
| (1) Variable Name |
|---|
| Name of the variable whose value should be rounded to the nearest whole number. (@syntax can also be used to select names of variables.) |
# Description
If you assign xcmndRound with the name of a variable, CpExtra will then read that variable's value, round it to the nearest whole number, and then re-assign the new rounded number back into the same variable.
# Examples
- 3.3 will be rounded to 3
- 6.6 will be rounded to 7
- 1.5 will be rounded to 2
To run xcmndRound on multiple variables at once, you can assign the names as a comma delimited list:
Assign | xcmndRound with MyVar1, MyVar2, MyVar
You could also use an @syntax query and xcmndRound will be run over all variables with names that match the query. For example, assigning xcmndRound as shown below would round all variables with a name beginning with MyVar.
Assign | xcmndRound with MyVar@
Common issue with assigning a direct variable name
Please see this page for an explanation of an issue that happens when you assign a direct variable name to another variable.
# See Also
# xcmndRoundTo
| (1) Variable Name | (2) Number of places | (3) String (default: nearest) |
|---|---|---|
| Name of the variable whose value should be rounded to a specific number of decimal points. (@syntax can also be used to select variables by name.) | Number of decimal points to which the variable value should be rounded. | OPTIONAL: This parameter will over-ride the default behaviour to round to the nearest decimal number. It indicates the direction of the rounding by using either up or down keywords. |
# Description
xcmndRoundTo takes a decimal number and rounds it to a set number of decimal places. The second parameter determines the number of decimal places. The default behaviour is to simply round to the nearest value that still preserves the required number of decimal places specified in the second parameter. The third parameter can be used to over-ride the default nearest number behaviour and force the rounding direction to be either up or down.
# Use cases
If you had a variable called MyVar with the value 6.6666666, assigning xcmndRoundTo with the following code will change the value of MyVar to: 6.67.
Assign | xcmndRoundTo with MyVar, 2
...
However, if you had instead used the following assignment...
Assign | xcmndRoundTo with MyVar, 4
...then the value of MyVar would change to: 6.6667
The optional third parameter allows you to designate whether xcmndRoundTo should be forced to round the value up or down with the same number of decimals.
So using this assignment...
Assign | xcmndRoundTo with MyVar, 2, down
..would change MyVar to: 6.66
By default if no third parameter is set, xcmndRoundTo will round to which ever number is closest, while still maintaining the number of decimal points specified in the second parameter.
# xcmndScore
# Parameters
# Get Mode
| (1) Variable Name | (2) Interactive Object |
|---|---|
| The name of the variable in which to record the score of the interactive object named in the second parameter. | The name of the quiz reporting object who's score you want to store in the variable named in the first parameter. |
# Set Mode
| (1) Interactive Object | (2) Number OR Variable Name |
|---|---|
| The name of the quiz reporting object whose score will change to the value shown in the second parameter. | The number value that should become the new score for the reporting object named in the first parameter. (Special keyword: max) |
# Description
xcmndScore is a variable with a get and set mode. To learn more about interacting with these types of variables, please see this part of the help.
# Use cases
Set mode allows you to change the score that an interactive object will report to the quiz. This enables conditional scoring, where an object might report a score somewhere between 0 and it's maximum possible score.
For example, say you have a button called SubmitButton set to report a score of 4 points to the quiz when clicked (as shown in the screenshot below).
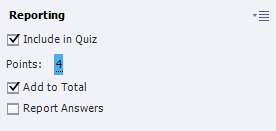
However, imagine this button is just a component in the interaction shown below:

Let's say there is a correct answer for each Text-entry Box. If the learner enters the correct first name, last name, email and password then the SubmitButton object can report four points to the quiz.
But what if the user enters the email field incorrectly? Perhaps then you want SubmitButton to report 3 points to the quiz instead of the maximum 4. Under those conditions you could change SubmitButton's score by using xcmndScore in set mode with the following code:
Assign | xcmndScore with SubmitButton, 3
In the real world, you may also need to dynamically change SubmitButton's score based on the value of a variable.
For example, you could create a custom User Variable called InteractionScore with a default starting value of 0. You can then use an Advanced Action to check the values entered in each text field and, if correct, you increment InteractionScore by 1 for each field. After checking the value entered in each of the four TEBs you can then update SubmitButton's score using the value now stored in the InteractionScore variable as follows:
Assign | xcmndScore with SubmitButton, InteractionScore
Over and under reporting
You can set an object's score to be any number. Even a number lower than zero or higher than what was configured for the object in Captivate. However, it is important to keep in mind the following points:
- LMSs usually behave more reliably when course success is reported as a percentage rather than a point score. If a course reports a score that results in something higher than 100%, most LMSs do not know how to handle that situation and may react in unexpected ways. Any ability to artificially manipulate the score of interactive objects must therefore be used with care to avoid causing the overall score of the course to exceed 100%.
- Similarly, LMSs do not generally know how to handle negative scores, so these are best avoided as well.
So for both circumstances we recommend checking the percentage score of the course on the last slide, and if it is higher than 100% or lower than 0%, use xcmndScore to adjust a particular object's score to bring everything within the boundaries of 0% and 100%.
The max keyword
To set an object to its maximum highest possible score you can use the max keyword as shown below:
Assign | xcmndScore with SubmitButton, max
Using get mode you can also read an interactive object's score and then use this in other actions. For example, if you wanted to record SubmitButton's score into a variable called MyVar you could do so with the following code:
Assign | xcmndScore with MyVar, SubmitButton
# See Also
# xcmndSetCursor
# Parameters
| (1) Slide Object Name | (2) CSS Mouse Cursor ID |
|---|---|
| The name of the slide object over which you want to display a custom cursor. (@syntax and #syntax can also be used to select objects by name.) | The ID of the cursor to display. Click here to see a list of valid ids (opens new window) |
# Description
When you move your mouse cursor around the screen you will often find it changes to a different type of cursor depending on what type of object is beneath the cursor. For example, if you roll over a button the cursor may turn into a hand. If you roll over a text field it will usually turn into an I-beam. These different cursors provide feedback and give a hint as to how the user can interact with the interface at that point.
xcmndSetCursor allows you to set what kind of cursor will appear when the learner rolls over a specific slide object. To set this correctly, you'll need to know the CSS id of the cursor you wish to display. Click here to see a list of valid CSS cursorids. (opens new window)
# Use cases
Let's say you want a hand cursor to appear when you roll over an object named SmartShape_1. You could accomplish this assign xcmndSetCursor with the following code:
Assign | xcmndSetCursor with SmartShape_1, pointer
To show a loading animation when you roll over SmartShape_1 you could use this assignment code:
Assign | xcmndSetCursor with SmartShape_1, wait
To make the cursor invisible when rolling over SmartShape_1 you could use this assignment code:
Assign | xcmndSetCursor with SmartShape_1, none
WARNING
Currently browsers do not support this feature on mobile devices. The technology to change the shape of the learner's finger is still in development. (That's a joke y'all...)
# xcmndShow
# Parameters
| (1) Slide Object Name |
|---|
| The name of the slide object to show. (@syntax and #syntax can also be used to select objects by name.) |
# Description
Assign the name of a slide object to show that object. (The usage is exactly the same as xcmndHide which similarly accepts an assignment of the name of an object to be hidden.)
# See also
# xcmndWidth
# Parameters
| (1) Variable name | (2) Slide Object Name |
|---|---|
| The name of a variable that stores width (in pixels) of the slide object named in the second parameter. | The name of the slide object whose width is stored in the variable named in the first parameter. |
# Description
xcmndWidth gets the width of the slide object specified by the second parameter and assigns that number to the variable defined in the first parameter. (Width measurement is in pixels.)
At this time there is no set mode for xcmndWidth. It can only get the height of the slide object, not change it.